Monitoring your blood pressure at home is one of the most effective things you can do for your long-term cardiovascular health — but only when you get it right. A wrist blood pressure monitor makes regular tracking portable and convenient, yet it’s also one of the most misused health devices in the home. Small positioning errors can send your readings off by 10 mmHg or more, turning a useful health habit into a source of unnecessary anxiety. What are the best fitness routine for weight loss?
This guide walks you through exactly how to use a wrist blood pressure monitor correctly, from fitting the cuff to understanding what your numbers mean — with the common mistakes most other guides miss.
What Is a Wrist Blood Pressure Monitor and How Does It Work?
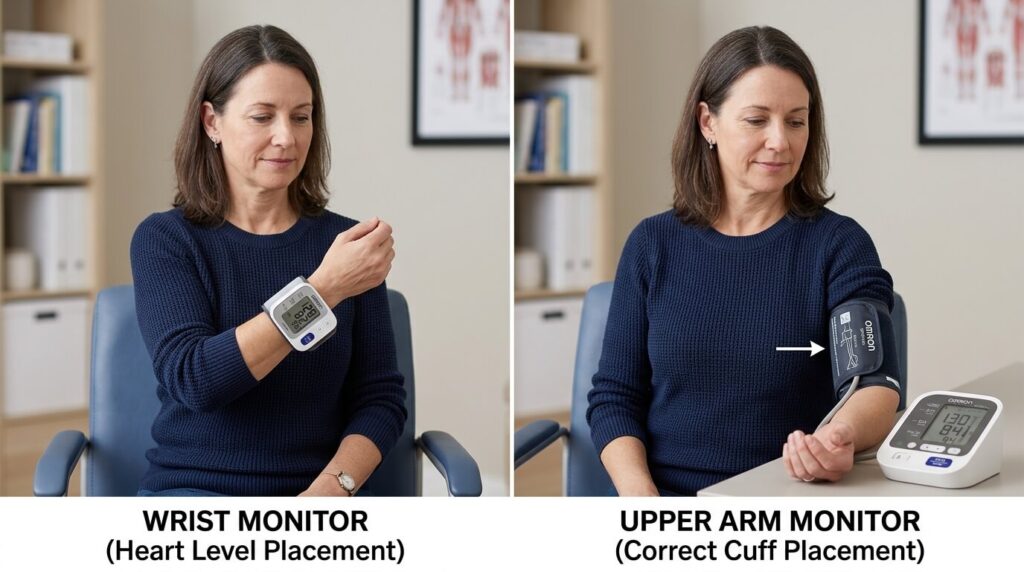
A wrist blood pressure monitor is a compact electronic device that wraps around your wrist like a watch. It uses oscillometric technology — detecting pressure oscillations in the arterial wall — to calculate your systolic and diastolic blood pressure via the radial artery, the pulse point on the inside of your wrist.
Unlike traditional manual devices used in clinical settings, wrist monitors inflate and deflate automatically and display your results on a digital screen in under a minute.
Wrist Monitors vs. Upper Arm Monitors: Key Differences
| Feature | Wrist Monitor | Upper Arm Monitor |
|---|---|---|
| Artery measured | Radial | Brachial |
| Portability | High | Moderate |
| Accuracy risk | Higher (position-sensitive) | Lower |
| AHA recommendation | Secondary option | Gold standard |
| Cuff size flexibility | Fits most wrists | Requires correct arm cuff size |
The American Heart Association recommends upper arm monitors as the gold standard for accuracy. Wrist monitors are a valid alternative when used correctly — but they require stricter technique because the radial artery is shallower and more sensitive to wrist position.
Who Should Use a Wrist Blood Pressure Monitor?
Wrist monitors are particularly well suited for:
- People with very large arms who cannot find a properly fitting upper arm cuff
- Individuals who have had lymph nodes removed from the armpit, where arm cuff use may be contraindicated
- Those who need a portable, travel-friendly solution for frequent monitoring
- People with mobility issues that make using an arm cuff difficult or painful
If you are monitoring for a diagnosed condition such as hypertension or are adjusting medication under medical supervision, speak with your doctor before switching from an upper arm to a wrist device.
How to Use a Wrist Blood Pressure Monitor: Step-by-Step
Getting accurate readings depends as much on preparation and positioning as it does on the device itself.
Step 1 — Prepare Your Body and Environment
Before you even put the monitor on, give your body time to settle:
- Sit quietly for 5 minutes in a chair with back support and both feet flat on the floor. Do not cross your legs.
- Avoid caffeine, tobacco, alcohol, and exercise for at least 30 minutes before measuring. All of these temporarily elevate blood pressure.
- Empty your bladder. A full bladder can raise systolic readings by several mmHg.
- Do not measure when stressed, anxious, or immediately after an argument. Emotional arousal directly activates the sympathetic nervous system and raises readings.
- Switch off distractions. Do not watch television or hold a conversation during the test.
These conditions are not optional courtesies — they’re clinically significant. Each factor on this list has been shown to affect the reliability of blood pressure measurements.
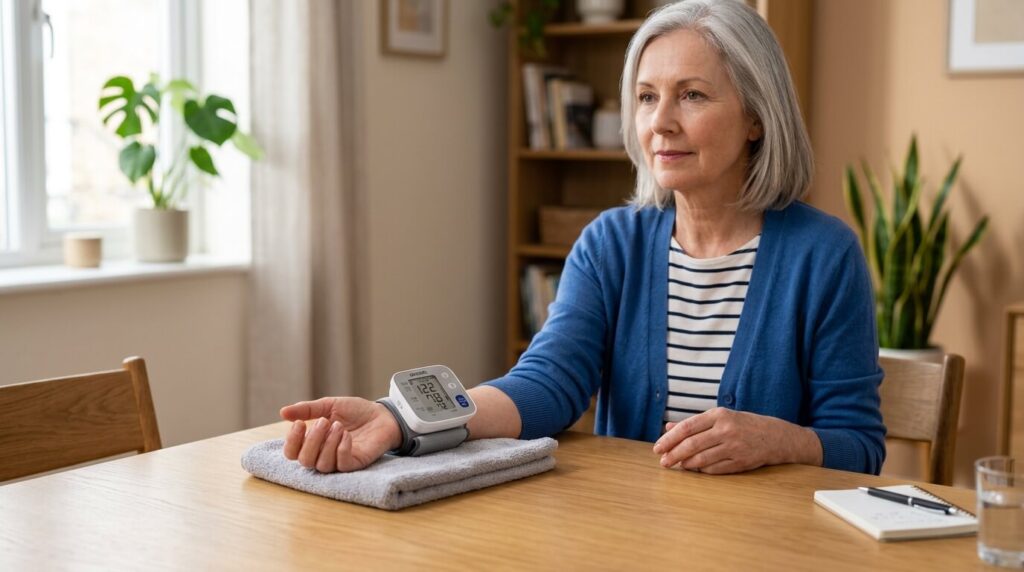
Step 2 — Fit the Cuff Correctly
- Place the monitor on your bare wrist — never over clothing or a sleeve, even a thin one.
- Position the cuff 1–2 cm (roughly half an inch) above the base of your palm, where the wrist meets your hand.
- The display should face upward, toward you.
- Tighten the cuff so it’s snug but not restrictive — you should be able to slip one finger underneath it, but not two.
Cuff fit matters more than most people realise. A cuff that’s too loose cannot properly detect pulse pressure and will produce falsely elevated readings. One that’s too tight restricts blood flow. Most wrist monitors are designed for wrist circumferences between 13.5 cm and 21.5 cm — check your wrist measurement before buying.
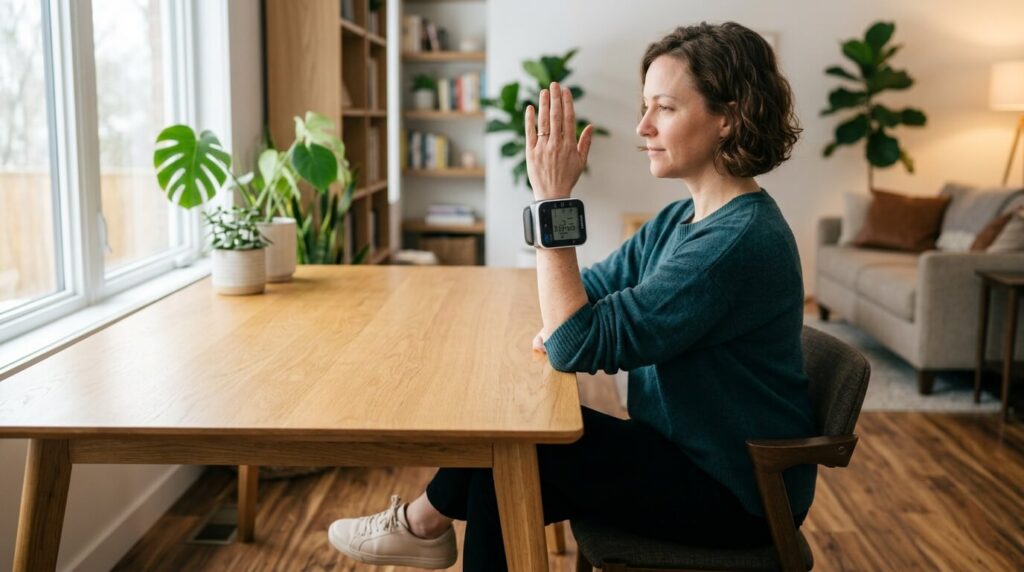
Step 3 — Position Your Wrist at Heart Level
This is the single most critical step — and the most commonly skipped.
Your wrist must be at the same height as your heart throughout the entire measurement. Gravity affects blood pressure readings: if your wrist is lower than your heart, readings will be artificially high; if it’s higher, they will be artificially low.
How to achieve heart-level positioning:
- Rest your arm on a flat surface (a table or desk) at roughly chest height.
- Alternatively, cross your forearm across your chest, placing your wrist directly over your heart while supporting your elbow with your other hand.
- Some modern wrist monitors include a position indicator — a sensor or on-screen guide that confirms you’ve reached correct heart-level alignment. Use it if your device has one.
Step 4 — Take the Reading
- Press the start button and remain completely still and silent.
- Do not flex your wrist, clench your fist, or move your arm.
- Breathe normally and do not hold your breath.
- The device will inflate, measure, and display your reading within 30–60 seconds.
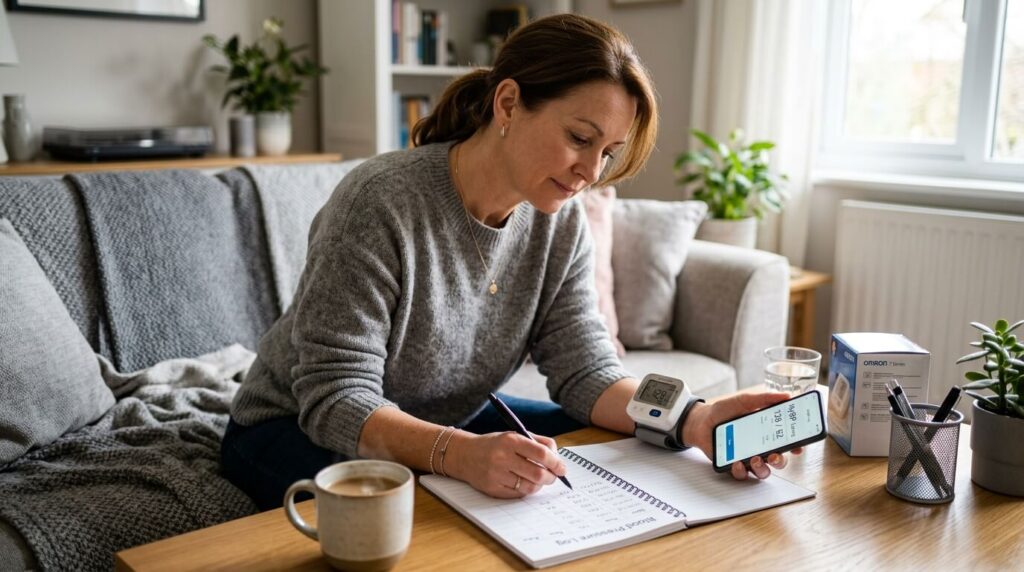
Step 5 — Record and Repeat
- Wait 1–2 minutes, then take a second reading.
- If the two readings differ by more than 5 mmHg, take a third and average the results.
- Record the date, time, and both readings in a blood pressure log (notebook or app).
Taking two readings per session — and measuring twice daily if your doctor has advised it — gives you a much more meaningful data set than a single number.
Understanding Your Blood Pressure Readings
Blood pressure is expressed as two numbers measured in millimetres of mercury (mmHg):
- Systolic (top number): The pressure in your arteries when your heart contracts and pumps.
- Diastolic (bottom number): The pressure between heartbeats, when your heart is at rest.
Blood Pressure Categories at a Glance
| Category | Systolic (mmHg) | Diastolic (mmHg) |
|---|---|---|
| Normal | Less than 120 | Less than 80 |
| Elevated | 120–129 | Less than 80 |
| High – Stage 1 | 130–139 | 80–89 |
| High – Stage 2 | 140 or higher | 90 or higher |
| Hypertensive Crisis | Higher than 180 | Higher than 120 |
| Low (Hypotension) | Less than 90 | Less than 60 |
Source: American Heart Association blood pressure categories
A single reading outside the normal range is not a diagnosis. What matters is the pattern across multiple readings over days or weeks.
Why Wrist Readings May Differ from Arm Readings
Wrist measurements are taken at the radial artery, while clinical and upper arm monitors measure at the brachial artery. These arteries naturally carry slightly different pressure values. Research has found that wrist readings can differ from brachial readings — sometimes significantly — when technique is not precisely followed.
This is not a flaw in the device; it’s a physiological reality that highlights why positioning and consistency matter so much with wrist monitors.
Common Mistakes That Cause Inaccurate Readings
Most inaccurate home readings come down to user error, not device failure. The most frequent mistakes include:
- Wrist below heart level. The most common and impactful error. Even resting your wrist flat on a low table can artificially inflate readings.
- Talking or moving during measurement. Even casual conversation raises blood pressure temporarily.
- Cuff placed over clothing. Fabric interferes with the sensors and introduces measurement error.
- Measuring immediately after activity. Your blood pressure needs time to return to its resting baseline.
- Taking only one reading. Single readings are more variable than an average of two or three.
- Measuring at different times each day. Blood pressure fluctuates naturally across the day; inconsistent timing makes trend data meaningless.
- Bending or flexing the wrist. This compresses the radial artery and distorts the oscillometric signal.
How to Know If Your Wrist Monitor Is Accurate
Home devices — even quality ones — can drift over time. Here’s how to validate yours:
- Take it to your next GP or pharmacy visit. Ask your doctor or pharmacist to take a simultaneous reading with their calibrated upper arm monitor. A difference of up to 5–10 mmHg between devices is generally acceptable; larger gaps may indicate a calibration issue.
- Check for clinical validation. Look for devices validated to the AAMI/ESH/ISO universal standard — a global benchmark for blood pressure device accuracy. The British and Irish Hypertension Society also maintain a list of validated devices at bihsoc.org.
- Recalibrate or replace batteries annually. Sensor drift and battery degradation are genuine accuracy factors. Some manufacturers recommend annual professional calibration checks.
Tracking and Logging Your Blood Pressure at Home
A blood pressure monitor is only useful if you actually use the data it produces. Build these habits:
- Log every reading with the date, time, and relevant context (e.g., “stressful work day,” “took medication,” “poor sleep”).
- Measure at consistent times — most clinical guidelines suggest morning (before breakfast and medication) and evening (before bed).
- Take readings for 7 consecutive days before a GP appointment to give your doctor a meaningful trend rather than a single point.
- Use a Bluetooth-enabled monitor if you prefer digital tracking. Many modern wrist monitors sync to smartphone apps that automatically log, chart, and even share readings with healthcare providers.
- Share your log with your doctor. Home monitoring data helps clinicians distinguish true hypertension from white coat hypertension (where blood pressure rises in clinical settings but is normal at home) — a distinction that directly affects treatment decisions.
Caring for Your Wrist Blood Pressure Monitor
A well-maintained device gives more reliable readings for longer:
- Clean the cuff by wiping it with a soft, dry cloth after use. Avoid water on electronic components.
- Store it in a cool, dry place away from direct sunlight and humidity. Extreme temperatures affect sensors and battery life.
- Replace batteries promptly when the low-battery indicator appears — a weakening battery can affect measurement quality before the device stops working entirely.
- Avoid dropping the device. The pressure sensor is a precision component and impact damage may not be externally visible.
- Follow manufacturer guidelines for calibration intervals. Some devices include self-checking functions; don’t dismiss these alerts.
Frequently Asked Questions
Are wrist blood pressure monitors accurate?
Yes, wrist monitors can produce accurate readings when used exactly as directed — particularly maintaining wrist-at-heart-level positioning. They are generally considered slightly less reliable than upper arm monitors, but the difference largely disappears when technique is correct. The American Heart Association recommends upper arm monitors as the primary option, with wrist monitors as a suitable alternative for those who cannot use arm cuffs.
Why is my wrist blood pressure monitor giving different readings each time?
Variability most often comes from technique inconsistencies: different wrist heights, measuring at different times, or moving during the test. Blood pressure also fluctuates naturally throughout the day. Take two readings per session with one to two minutes between them and average the results for a more stable figure.
How do I position my wrist correctly when taking blood pressure?
Your wrist must be at heart level throughout the measurement. You can achieve this by resting your forearm on a surface at chest height, or by crossing your arm across your chest with your wrist over your heart. Some monitors include a position indicator that confirms correct height.
Can I use a wrist monitor instead of an upper arm monitor?
In many cases, yes. Wrist monitors are particularly appropriate if you have very large arms, have had lymph node removal from the armpit, or need portability. However, for people managing hypertension with medication, your doctor may prefer you to use an upper arm device for closer clinical alignment.
How often should I take my blood pressure with a wrist monitor?
For general wellness monitoring, once or twice daily is common — typically morning and evening. If you’re monitoring at your doctor’s request, follow their specific schedule. Most guidelines suggest logging readings over seven days to establish a meaningful baseline.
How do I know if my wrist monitor needs calibrating?
If your home readings consistently differ from GP readings by more than 10 mmHg, bring your device to your next appointment for a side-by-side comparison. Most manufacturers recommend annual calibration checks. Replace batteries as soon as the low-battery indicator appears, as declining battery power can affect accuracy.
What should I do if my blood pressure reading is very high?
A single high reading is not a diagnosis. Sit quietly for five minutes, recheck your technique, and take a second reading. If readings remain elevated (above 140/90 mmHg) across multiple sessions over several days, contact your GP. If you read above 180/120 mmHg and have symptoms such as chest pain, severe headache, or vision changes, seek urgent medical attention.
Start Monitoring Smarter
A wrist blood pressure monitor is a genuinely powerful tool for staying ahead of your cardiovascular health — but getting accurate readings requires more than pressing a button. The difference between a useful reading and a misleading one often comes down to five seconds of positioning.
Follow the steps in this guide consistently: prepare your body, fit the cuff correctly, hold your wrist at heart level, and log your results over time. Then share that data with your doctor. That’s the combination that turns a home device into a real health asset.